(PDF file) Running First Script Packages Installing a Custom Package Variables Intro Variable Types Operations Type Casting String Concatenation Methods User-Defined Methods Lists Indexing of Lists Appending to Lists If/Else Statements Using the "in" Keyword Loops Pandas DataFrames Reading in Data Adding New Columns Adding New Rows Getting Column Names .iloc[] Exporting Data From Here On...
Intro
Welcome to the site! In these short segments, we will learn the basics of Python as fast as possible. As a preview of what is to come, in this section we will:- Install Python and Anaconda: we will be using Anaconda (specifically Jupyter) to code, but you are free to use any compiler you like
- Run your first script
- What packages are and how to install them
- Basic to Python variables
- What methods are
- What lists are
- If/Else statements
- Loops
- The basics of Pandas DataFrames
The goal of this series is to get you programming as fast as possible. As such, I would like to note that this tutorial section is far from complete. For more in-depth tutorials, there are options from resources like W3 Schools. These will cover things as if you were in a traditional introductory class to programming in Python. If you can complete the exercises in dataframes, by the end of all the sections, you have learned most of everything important in this overview.
While testing, I noticed that the files open in the browser instead of downloading. You can change this in chrome settings or copy and paste the solutions into text files, and rename them to .ipynb files.
Installing Python and Anaconda
1) Go to www.anaconda.com/products/individual2) Scroll to the very bottom
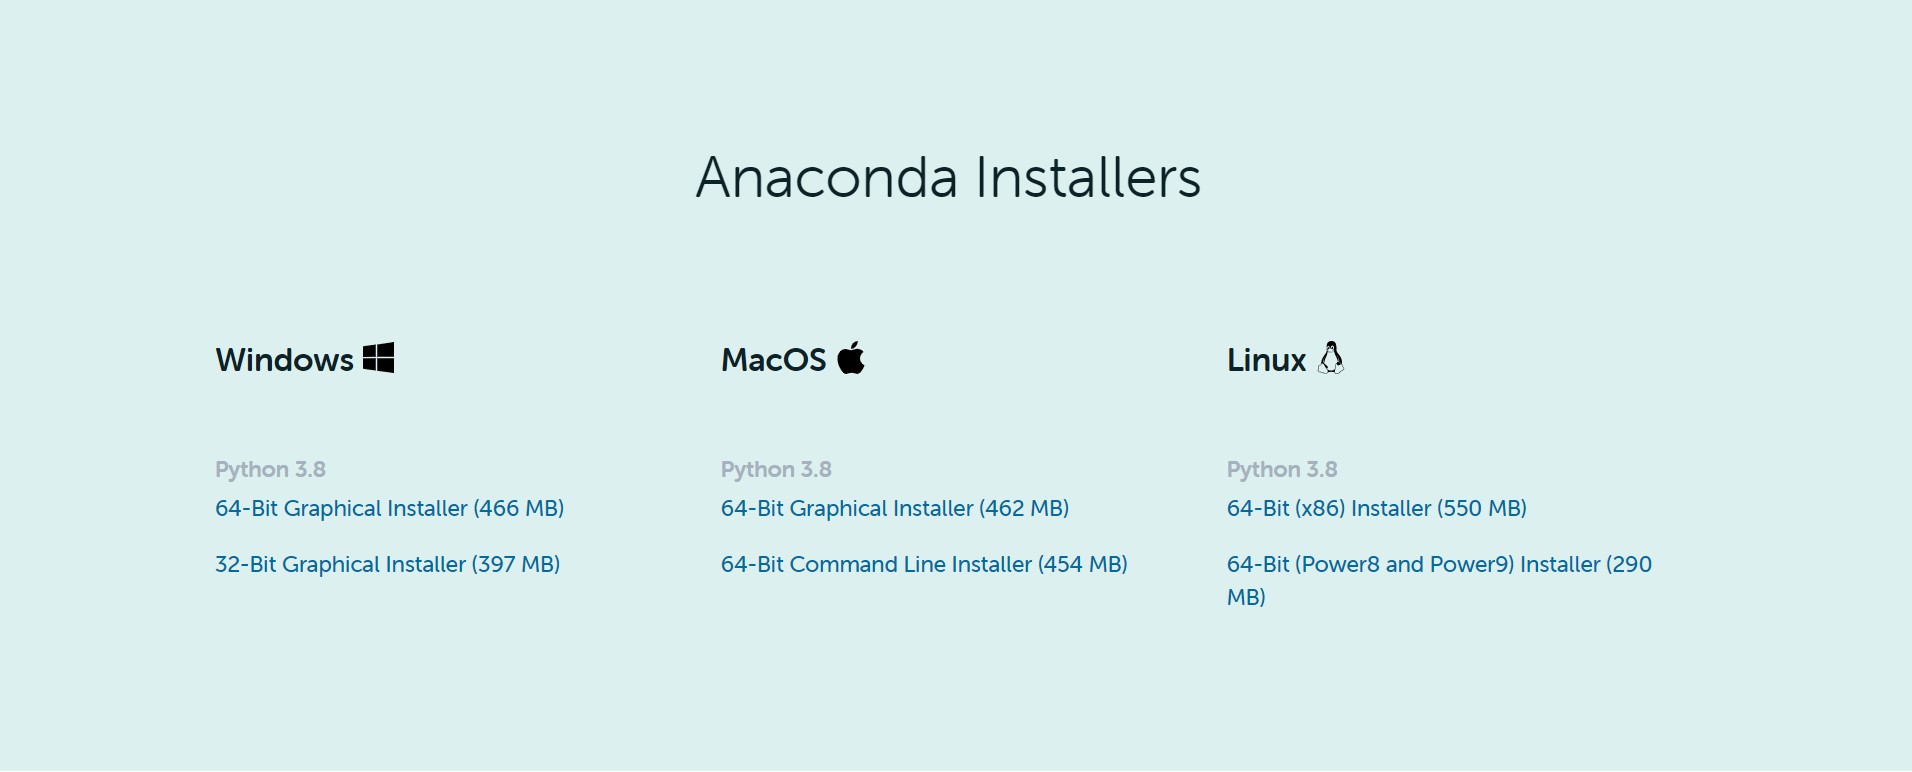 3) Choose your OS and download the latest version of Python 3
 **(Python 3 is recommended, but Python 2 works just as well for the basics with a few syntax differences)
4) Follow the instructions (click next a few times) - I have not changed the default settings except for where Anaconda is installed
More in-depth instructions: Download File
First Python Script - Print "Hello World"
1) Using the windows search bar, search and open Jupyter Notebook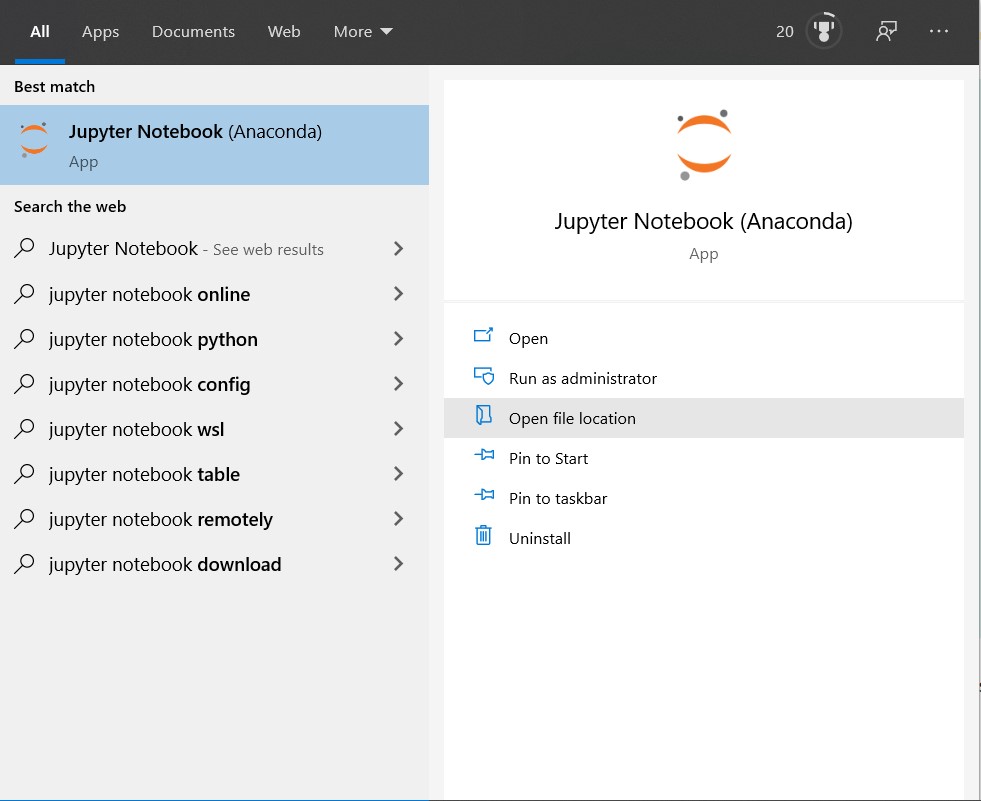
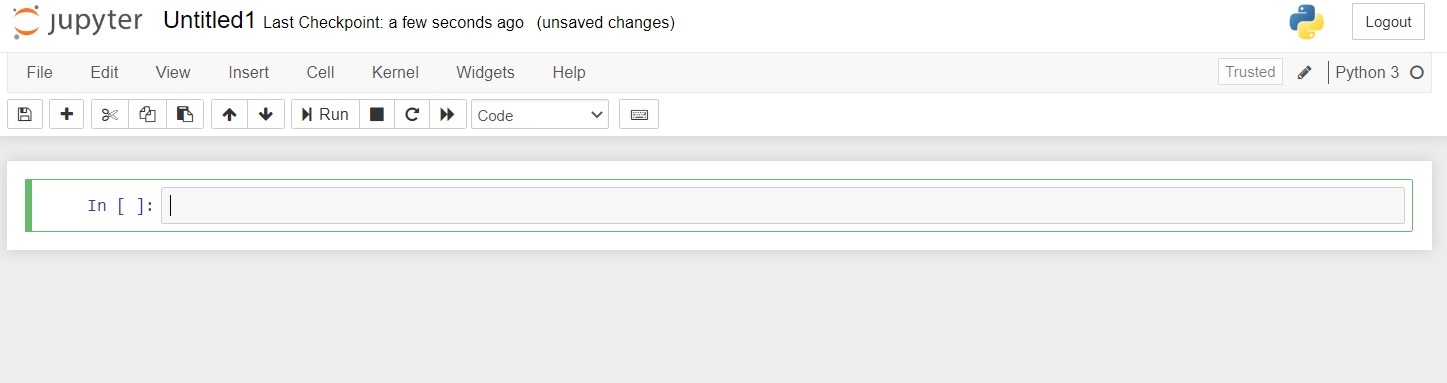
2) Once you open Jupyter, you should arrive at a landing page with this menu at the top:

3) One the right side: Click "New" and then "Python 3". You should arrive at:
4) In the first cell, type: "print('Hello World')". The output should be:

Your task is simply to print another phrase in python. Print "I want to learn Python" by altering the code in the example.
Solution: Download File
What are packages?
Packages are prewritten pieces of code (methods and classes) that you can import to use. There are two main ones: Pandas and NumPy. There are also two important keywords: "as" and "from":- "as" allows you to refer to an imported package with a different name
- "from" allows you to import specific sections of a package.
Here is an example:

You can see that Pandas is imported as pd and NumPy is imported as np. Most people use pd to refer to Pandas and np to refer to NumPy.
Installing Other Packages:
While Anaconda comes with a lot of pre-installed packages (one of the reasons that a lot of people use it), you will most likely have to install another package at some point in time. To do so:
1) Go to the anaconda prompt (search for it in the windows task-bar)
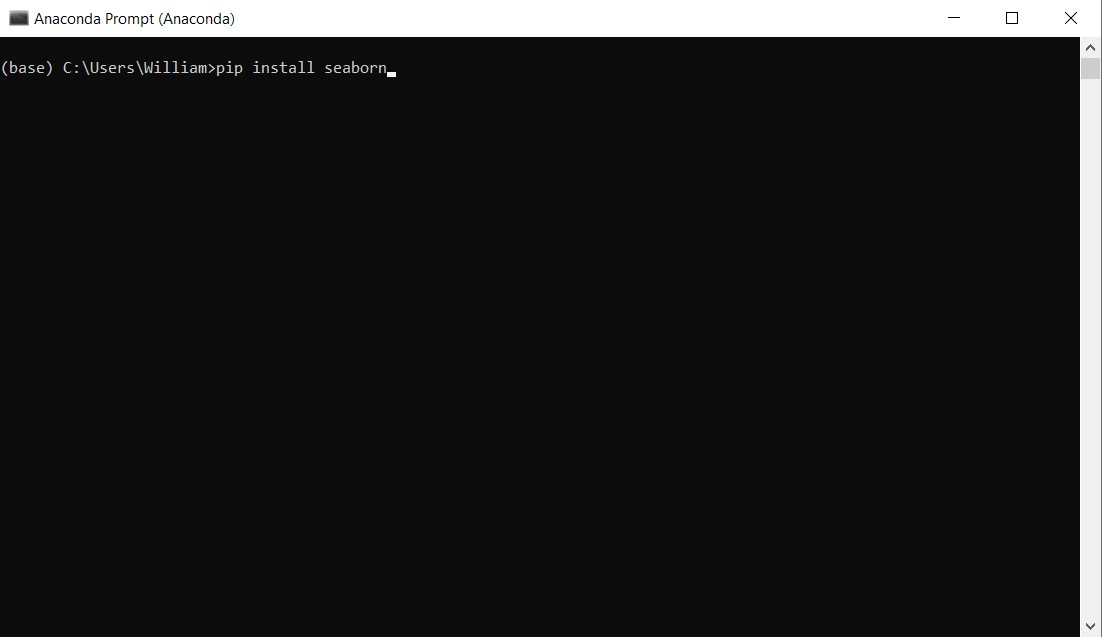
2) Use "conda install PackageName" or "pip install PackageName". In the example above, I installed a package called seaborn (makes graphs prettier).
Variables in Python
For anyone with a bit of programming experience, variables are largely no different in Python compared to other programming languages. The one thing to note is that you do not have to declare their type.Types:
Variables in programming languages come in various forms (i.e Strings, Integers, Floats). Here are a few common ones:
- str: Strings that contain a length of text. They are denoted with either a set of single quotes or double quotes.
- int: Integers. Practically, the same as integers in math.
- float: Floating point integers. Basically, decimal numbers.
- bool: True/False variables
To assign a variable to a value use: VariableName = value. Here are some examples:
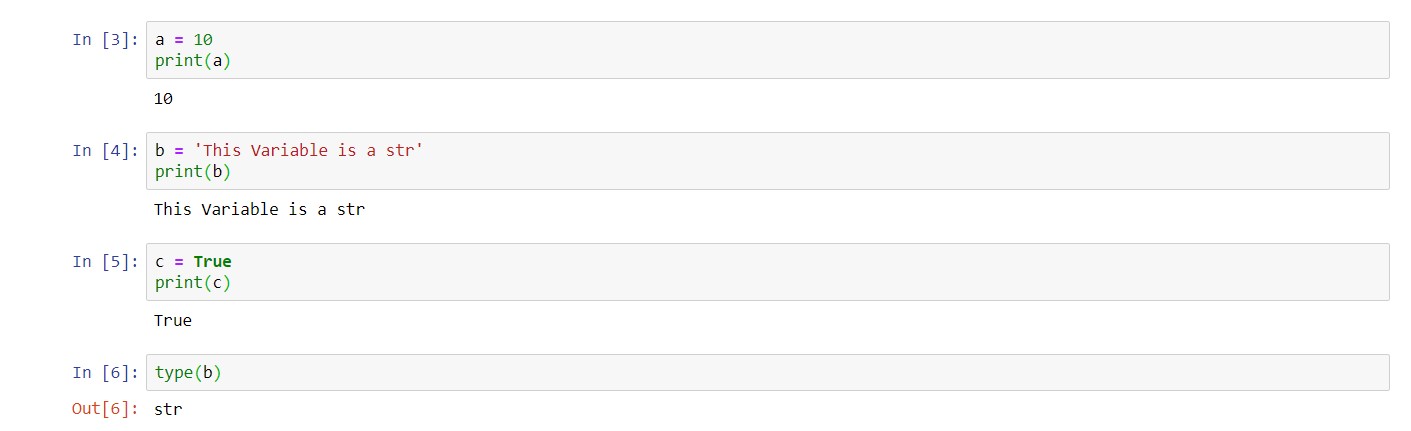
In the first block of code, we set a variable named a to a value of 10. Same concept for the remaining blocks of code. In the last block of code, we can see that there is a "type()". Putting a variable in the middle of these parentheses will return the type of the variable. Source Code: Download File
Operations:
Since this is programming, it should come as no surprise that we can do math(and other stuff) with variables. Otherwise, programming would be useless. Instead of going through a few paragraphs explaining in detail what you can do, I will just list the most common ones(the ones I found most useful) as examples below: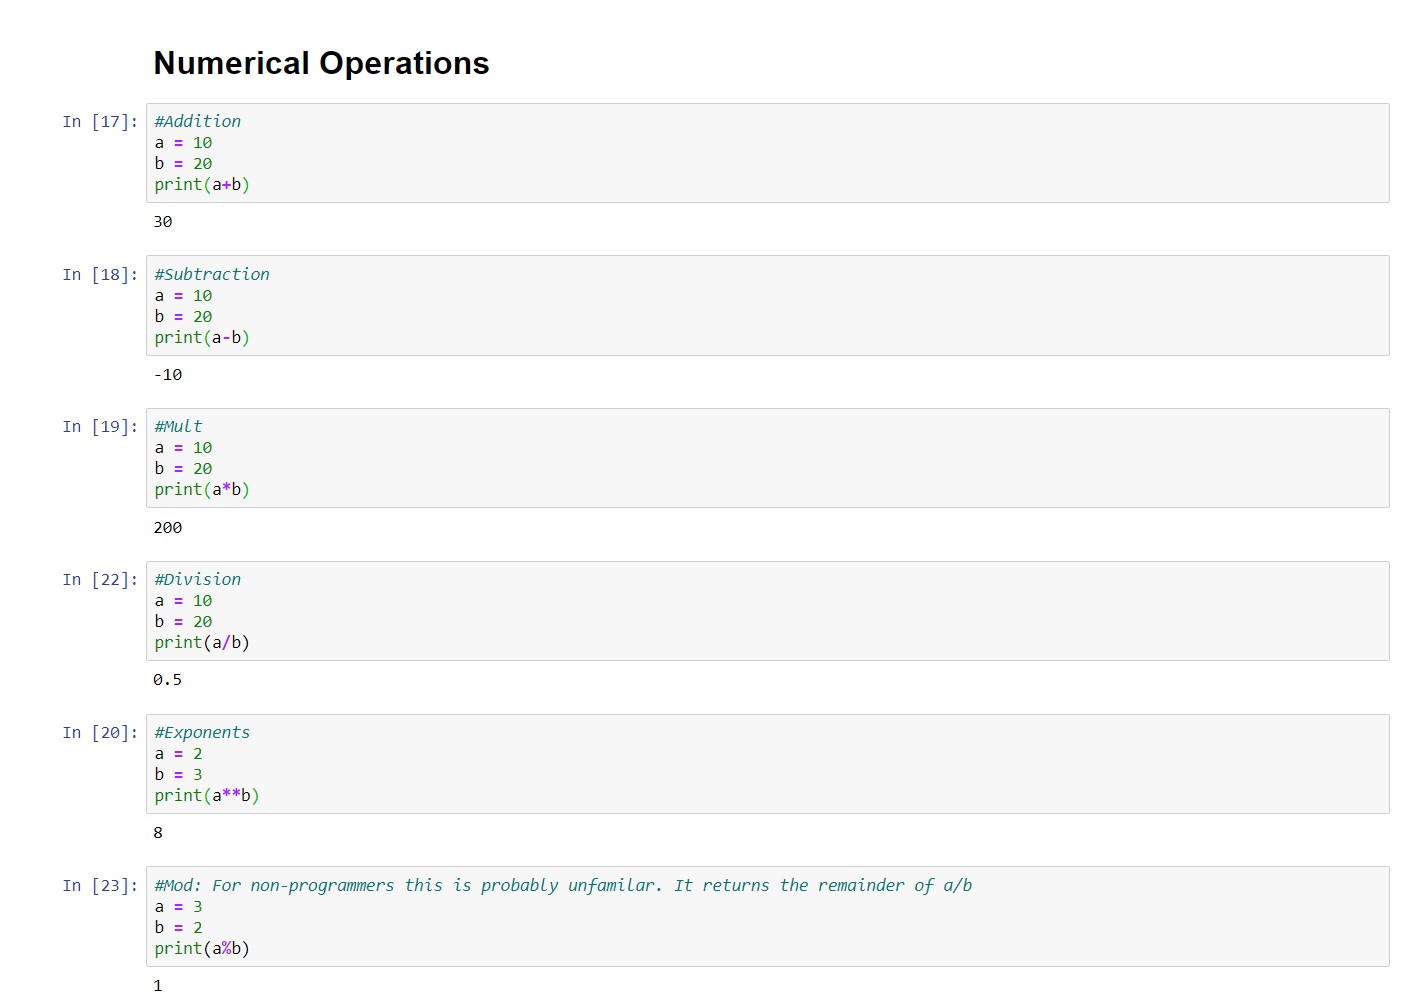
For numerics, you can do anything that you can do in normal math using the operators that normally define them on computers (i.e "x times y" is x*y). The two notable irregularities are:
- "a to the power of b" is a**b
- "a greater than or equal to b" is a>=b (same for less than)
Booleans:
There is also a section of CS called Boolean Algebra. Honestly, in my opinion its not that applicable in basic applications of programming and also not that interesting...Realistically, all you need to know for now is boolean(bool) variables can interace with each other just as integers can, except the operators are "and" and "or". The most basic explaination is that "x and y" will produce a true outcome if both x,y are true. "x or y" will be true if (quite literally) x or y is true. These most likely will make more sense in practice when we go over them in If\Else statements.
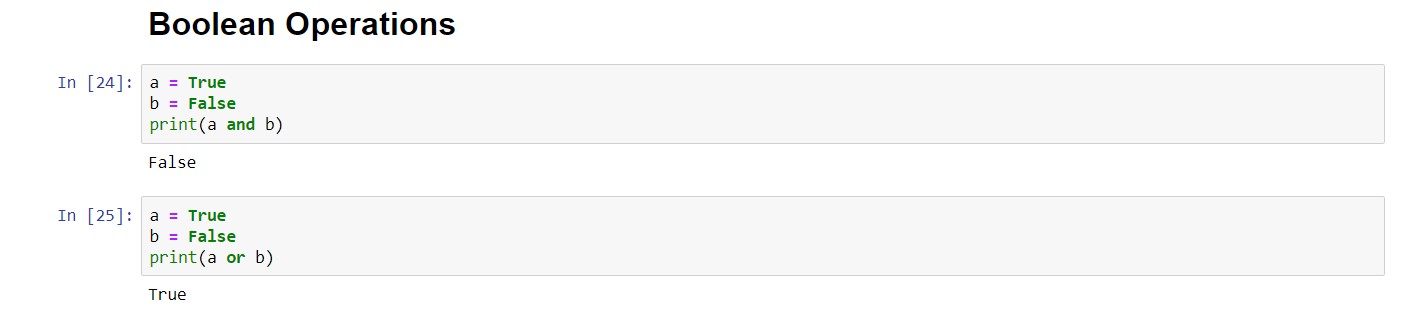
If it still doesn't make sense, think of the statement
"Tim needs to do the dishes and take out the trash"
In this case, Tim needs to do both things. Now think of:
"Tim needs to do the dishes or take out the trash"
Now Tim can choose what he wants to do.
Type Casting:
In Python we can make a variable another type. This is called casting. This is done by: type_to_change_to(x). By doing the previous, we will change x to whatever type_to_change_to is. For example:
Source Code: Download File
String Concatenation:
Concatenation is the act of combining two strings. The only caveat is that they both have to be strings. You can't concatenate a string and an integer. Here's an example:
Source Code: Download File
Methods:
Simply, a method is a worker whom you hand data to, he/she then processes the data and returns the result of that processing to you. There are a lot of them that come predefined in python (i.e print() which we have been using to display variables). Here are some more useful ones:
- print(): displays what is in the brackets
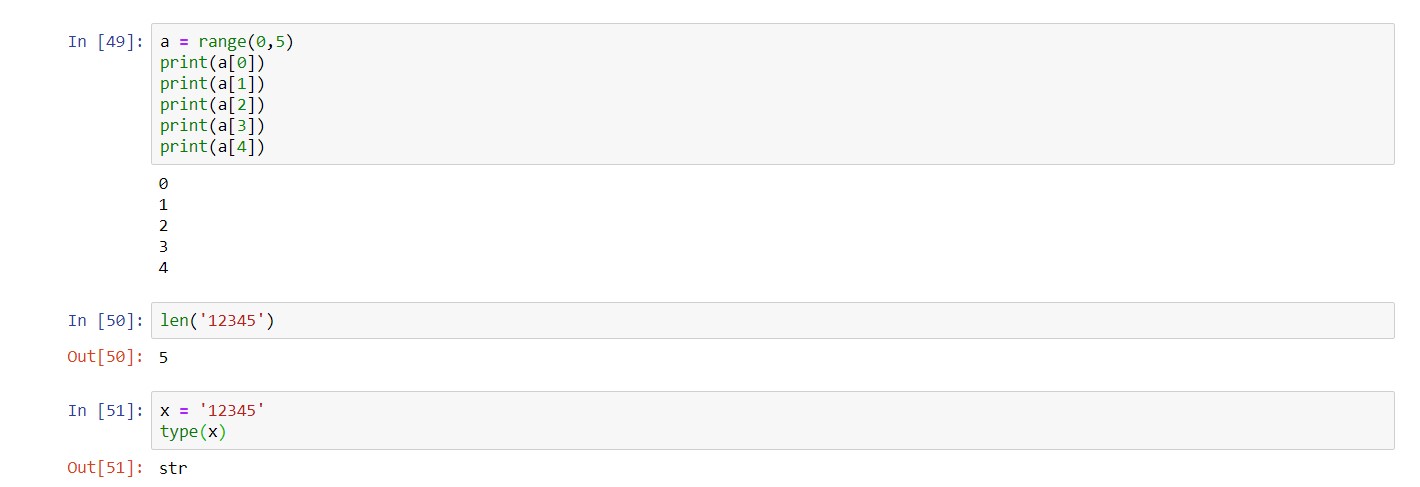
- range(x,y): creates a list (we will go over what this is later) where the first element is x and the last element is y-1.
- len(x): returns the length of x (if x is a string, think how many letters and spaces; if x is a list, think how many things are on that list ...)
- type(x): returns the type of variable x
User-Defined Methods:
What if we wanted to write our own method. We can write it using the following syntax:
In the example above, we have created a method that takes a number "x", preforms "y=x+1", and returns "y" to us. Note the variables in the first parentheses are the data that is passed in and the data in the line with the green return is what is given back to us. You can pass in multiple variables and return multiple datapoints, just separate them with a comma.
Source Code: Download File
List/Arrays:
There are times where we need to store multiple items in one variable. We do this by using lists. What is a list? Literally, it means a list of variables. Also, there is a small difference between list() and [], but it should not affect anything for now.
In the example above, the list "a" contains the elements (in this case integers): 1,2,3,4,5
Index:
Every element in a list is labeled as a number. We can access each individual element in the list using this number. The numbers are always assigned the same way: the first element is zero and for each subsequent element the index is increased by 1.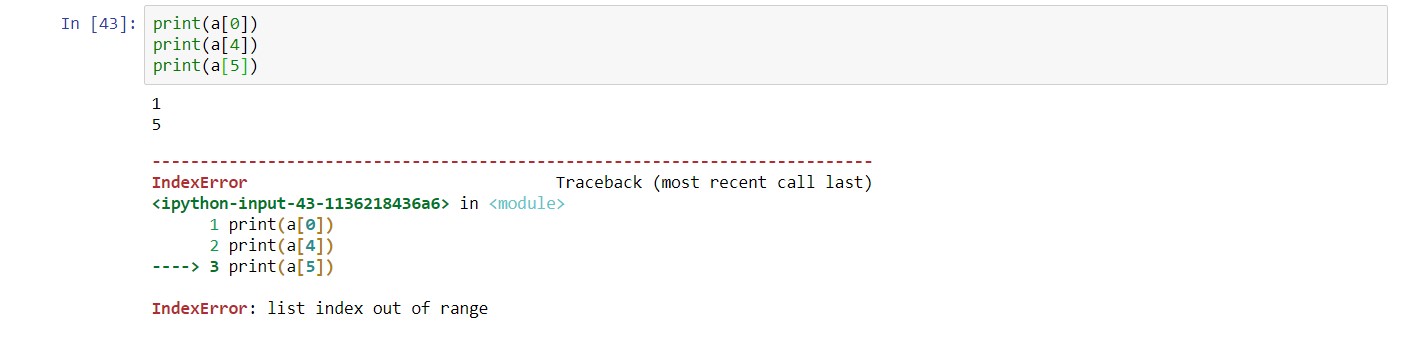
From the example above, we can see that the first element "1" can be accessed with the "0th" index, the last element can be accessed with the "4th" index. Note, there are five elements in the list, but the indexes only go up to 4. Using an index of 5 will produce an error.
Appending to Lists:
We can add elements to the list by using the .append() method. For example:
Surprisingly or not, in a data analysis setting I have never had to take elements out of an array, but the method for that is .remove() or .pop(). The first one removes the first occurrence of any element and the second removes the first element from a list.
If/Else Statements:
We can incorporate logic into our programs by using "if", "elif", and "else". Basically, we can say if (something1 is true) do something, if (something1 is not true and something2 is true) do something else, and if (everything is false) do a third thing. Here is an example:
We don't actually need the "elif" or the "else". If we only need to consider one condition:
 **If x < 10 in the case above, Python would do nothing
Using the "in" Keyword:
One more useful if else statement is checking if a word is in a string. To do this, we use the "in" keyword. The "in" keyword hasn't come up yet in this series, but hopefully an example will clear things up: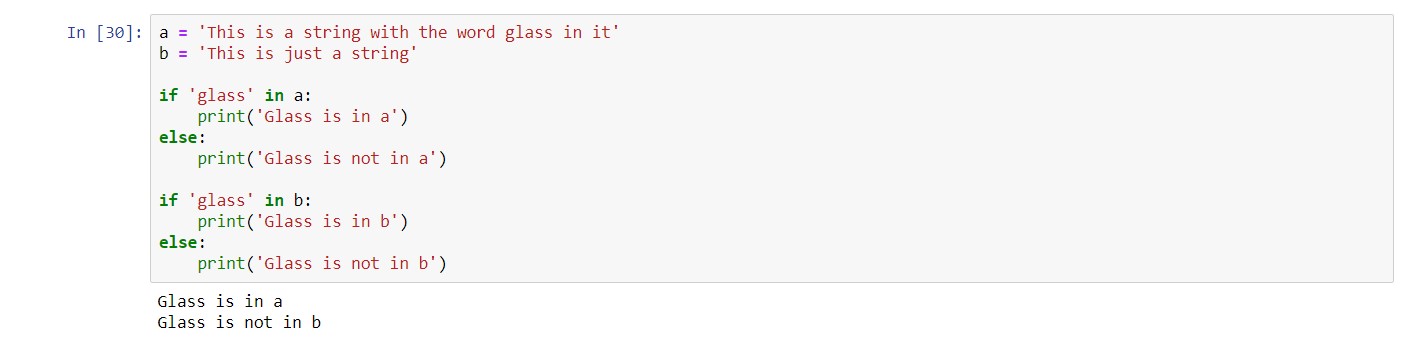
Checking if Variables are Equal:
To check if numbers are equal, we use "==". One "=" is assignment, two is to check if they are equal. To check strings, we use the same thing (unlike java).
Source Code: Download File
Loops:
**Note: For this quick tutorial, we will only cover for-each loops. There are more types of loops, just I haven't found them to be very useful.As its names suggest, a loop repeats things over and over again, until some condition is met. The type of loop I found most useful is the for-each loop. It does exactly what the name suggests: for each element in a list, it does something with it. Here is an example:

In the example above, we have made a list of the numbers 1 through 5. We then used a for each loop to go through every element in the list, assign it to i, and printed i. Source Code: Loops.ipynb
DataFrames:
Welcome to the bread and butter of analyzing data. Remember the package called pandas we stated in the package section? It's quite literally the excel of Python. Any tabular data will most likely be arranged in a DataFrame.Reading data in from a file:
Here are the two files we will use for demonstration: Line.csv and Line.csv1) To read a file in Python, it first needs to be uploaded to Anaconda (there is another way around this using paths). To do so, navigate to the directory in Anaconda where your code is, then click upload.
2) Import Pandas (we have also imported NumPy, this is optional but most of the time you have to do it anyway)
3) Read the file using "read_csv(filename)" or "read_excel(filename)" depending on if it is a .csv file or excel file.
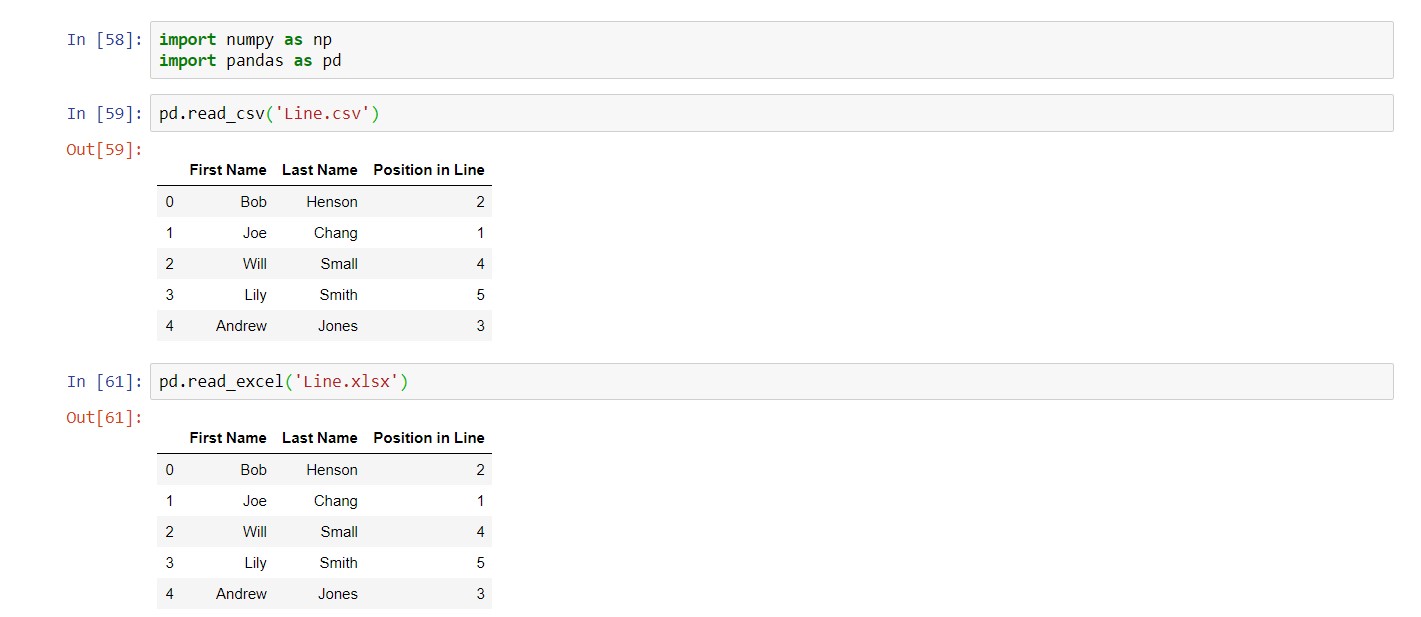
**Note: the DataFrames above have not been saved to a variable!
Adding a Column to a DataFrame:
We can make a new column using the following syntax (we add a column called "ID" with an array generated from the range method):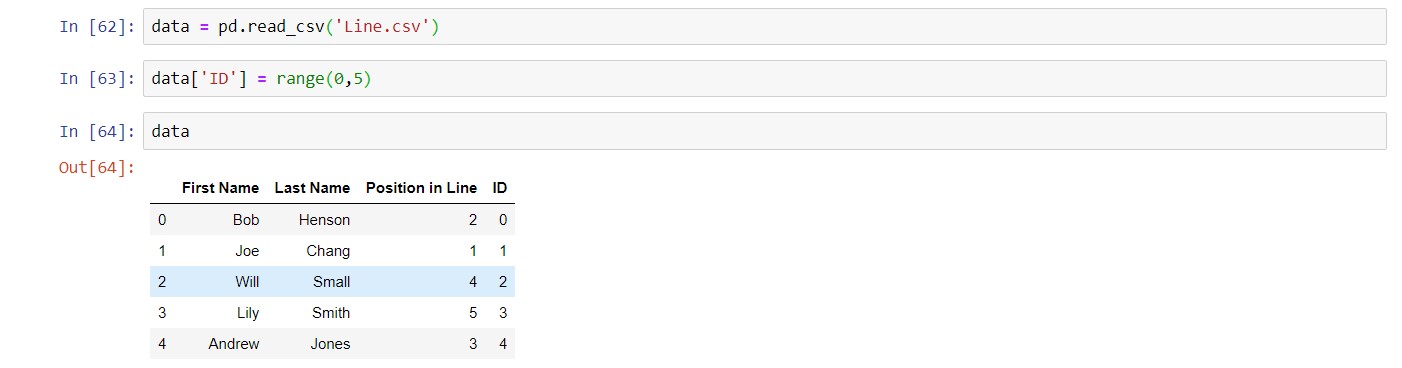
**Note: the array must be the same length as the number of rows in the dataframe!
Adding a New Row:
We can also make add a new row of data using the append() method. Note: we can only add DataFrames to DataFrames, for now. Hence, we have to create a new DataFrame.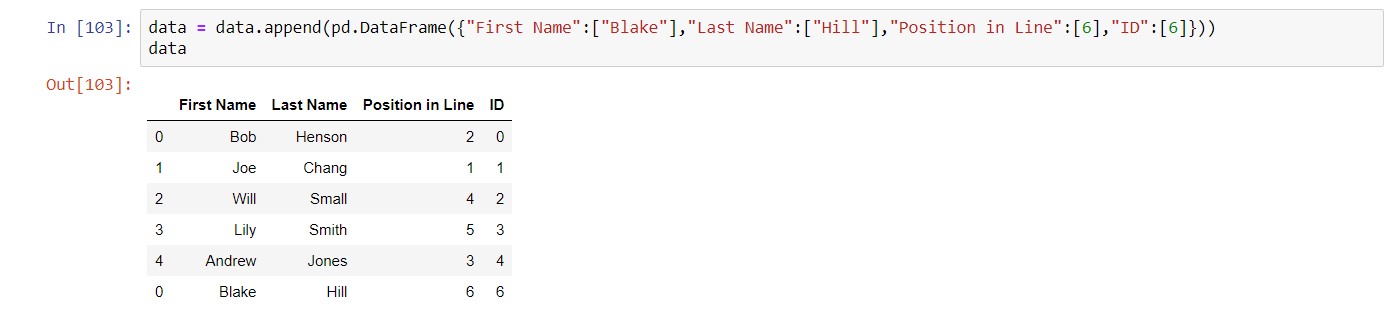
Getting Column Names:
We can do this by using a constant that comes with every DataFrame: .columns
The constant contains an array of all the column names.
.iloc
It would be pretty important for us to be able to get a specific row of the dataframe. To do that, we use the .iloc method:
By the way, the returned value is actuall a list, and you can access elements of the list by using their index.
Exporting Data
We have already covered how to input data, but how do we get it out? To do this, use the "to_csv()" or "to_excel()" methods. Here is an example:
Just like excel, there are several dataframe tricks that you won't know until you've encountered them. These exercises are hard if you don't know them. Don't be discouraged!
1) Import the dataframe from the example. Using a for-each loop, print out every row in the example dataframe.
2) Print only the 3rd row of the example dataframe
3) Add on a new row to the dataframe with the contents: ""First Name":['Bill'],"Last Name":["North"],"Position in Line":[6]"
4) Print the first name of the 4th person in the dataframe
5) Find the first person in the line
6) Export the revised dataframe to a CSV file named: "RevisedDataframe.csv"